Trace-Driven Simulation in Astra Sim with the PyTorch Profiler
Published
Collecting traces from PyTorch, converting them to Chakra Execution Traces, and simulating them in Astra-Sim for hardware design in an end-to-end tutorial.

In this tutorial, we will be:
- Creating a “Hello World” MNIST classifier in PyTorch
- Training the model for a single epoch
- Collecting traces using PyTorch Profiler + Execution Trace Observer
- Merging traces and converting them to Chakra Execution Traces
- Building Astra-Sim in docker
- Running an Astra-Sim simulation with the Chakra Execution Traces
Hardware and Network Simulators
Simulators are well-established, good proxies for real-world systems. Hardware and network simulators provide timings and output characteristics very similar to real-world systems. This is useful because new hardware and network designs may be tested in simulation and have real-world impact.
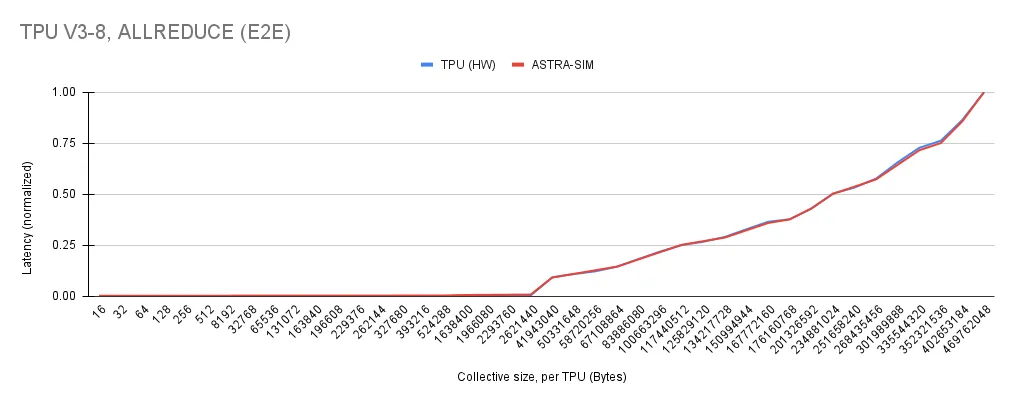
Correlating performance between Astra-Sim and a real-world experiment on a Tensor Processing Unit (TPU)
Getting Started
To get started with simulation, we will begin by with the classical example of classifying handwritten digits using the MNIST dataset. From this model, a single training epoch will be measured and traces will be collected using PyTorch Profiler and PyTorch Execution Trace Observer. These traces will then be merged and converted to Chakra Execution Traces and simulated using Astra-Sim.
Getting PyTorch Setup
First, install PyTorch and TorchVision using pip.
pip install torch torchvisionNext, we may import torch and setup cuda as a default device.
import torch
import torch.nn as nn

torch.device('cuda' if torch.cuda.is_available() else 'cpu')
Data Loading
To load the MNIST data, we will use a DataLoader from PyTorch. This will allow us to load the data in batches and shuffle the data for training and testing.
from torchvision import datasets
from torchvision.transforms import ToTensor
from torch.utils.data import DataLoader

# Loading the MNIST dataset
train_data = datasets.MNIST(root='data', train=True, transform=ToTensor(), download=True)

# Creating data loader
train_data = DataLoader(train_data, batch_size=64, num_workers=4, pin_memory=True)
Now, we have our data loaders configured to provide training examples to our model.
Defining a Model
We will define a simple Convolutional Neural Network (CNN) for classifying the MNIST dataset. For this contrived example, the model used will only be for demonstration purposes.
class CNN(nn.Module):
    def __init__(self):
        super(CNN, self).__init__()
        self.conv1 = nn.Sequential(
            nn.Conv2d(
                in_channels=1,
                out_channels=40,
                kernel_size=5,
                stride=1,
                padding=2,
            ),
            nn.ReLU(),
            nn.MaxPool2d(kernel_size=2),
        )
        self.conv2 = nn.Sequential(
            nn.Conv2d(40, 32, 5, 1, 2),
            nn.ReLU(),
            nn.MaxPool2d(2),
        )
        # fully connected layer, output 10 classes
        self.out = nn.Linear(32 * 7 * 7, 10)

    def forward(self, x):
        x = self.conv1(x)
        x = self.conv2(x)
        # flatten the output of conv2 to (batch_size, 32 * 7 * 7)
        x = x.view(x.size(0), -1)
        output = self.out(x)
        return output, x    # return x for visualization

cnn = CNN()
cnn.cuda() # move model to GPU
Now, with the structure of the model defined, we can move on to model training.
Defining an Epoch Training Function
To train the mode, we will first define a basic function which takes a batch of data from the data loader and uses it to train the model.
loss_func = nn.CrossEntropyLoss()
optimizer = torch.optim.Adam(cnn.parameters(), lr=0.001)

def train(batch_data):
    """
    Very basic training loop for a CNN model
    """
    # data movement
    images, labels = batch_data
    images, labels = images.cuda(), labels.cuda()

    # Forward pass
    output = cnn(images)[0]
    loss = loss_func(output, labels)

    # clear gradients for this training step
    optimizer.zero_grad()

    # backgpropagation, compute gradients
    loss.backward()

    # apply gradients
    optimizer.step()
Now, all we have to do is run the training loop with the profiler setup to cllect our traces.
Trace Collection
After setting up the model, we can collect traces with PyTorch Profiler. The PyTorch Profiler is a context manager that allows you to collect traces within your model’s training loop. For use in trace analysis, you must use a tensorboard_trace_handler to save the traces to disk with both CPU and GPU activity.
from torch.profiler import profile, schedule, tensorboard_trace_handler, ProfilerActivity, ExecutionTraceObserver

# the tracing schedule helps control for startup costs and warmup in PyTorch
tracing_schedule = schedule(skip_first=5, wait=5, warmup=2, active=2, repeat=1)

et = ExecutionTraceObserver()
et.register_callback("pytorch_et.json")
et.start()
with profile(
  activities = [ProfilerActivity.CPU, ProfilerActivity.CUDA],
  schedule = tracing_schedule,
  on_trace_ready=lambda x: x.export_chrome_trace("kineto_trace.json"),
  profile_memory = True,
  record_shapes = True,
  with_stack = True
) as prof:
  for epoch in range(1): # number of epochs
    for step, batch_data in list(enumerate(train_data))[:1]:
        train(batch_data)
        prof.step()

et.stop()
et.unregister_callback()
Following this, two files will be created: kineto_trace.json and pytorch_et.json. The kineto_trace.json file contains the traces for the CPU and GPU, while the pytorch_et.json file contains the PyTorch Execution Traces. Both files will be merged to create a single trace file.
Converting to Chakra Execution Traces (ET)
Charka is a library produced by Meta AI research with the goal of providing a standardized format for simulators, analyzers and collectors to use for traces.
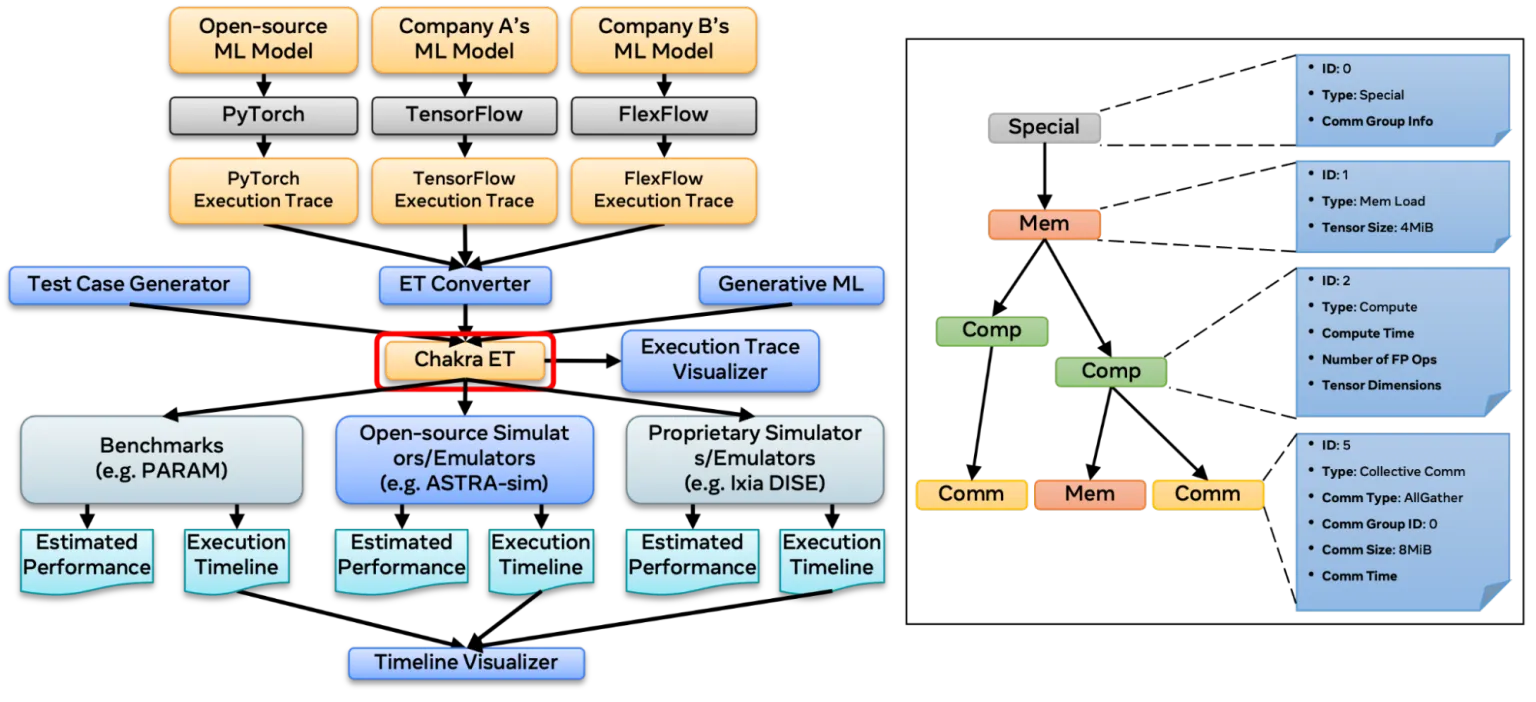
Chakra Execution Traes Providing a Centralized Data Format
Using Charka consists of converting PyTorch Execution Traces produced earlier into Chakra using Chakra’s execution trace converter.
First, begin by installing Chakra:
git clone https://github.com/mlcommons/chakra/
cd chakra
pip install -e .
cd ..
Then, use the trace linker to merge the PyTorch Execution Traces and the Kineto traces:
python -m chakra.trace_link.trace_link \
  --pytorch-et-file pytorch_et.json \
  --kineto-trace-file kineto_trace.json \
  --exact-match \
  --output-file merged_trace.json
This will produce a merged_trace.json file. However, this file is not in the Chakra format. To convert it to Chakra, use the following command:
python -m chakra.et_converter.et_converter \
  --input_type pytorch \
  --input_filename merged_trace.json \
  --output_filename chakra_traces \
  --num_dims 1
Finally, we have produced the file chakra_traces which is in the MLCommons Chakra format using both: PyTorch Execution Traces and Kineto traces. This file may now be used as input to Astra-Sim.
Setting Up Astra-Sim
Astra Sim is a trace driven simulator designed for both hardware and network simulation. To get started, we will build Astra-Sim from source in a Docker container.
git clone --recurse-submodules git@github.com:astra-sim/astra-sim.git
cd astra-sim
Note: this uses a rsa key, rather than https which is required because each submodule also has submodules which use RSA keys
After cloning, we can build the Docker container used to build and run the simulation. If you do not have Docker installed, please see the Get Docker.
# sudo docker run -it astra-sim # (interactive mode)
sudo docker build -t astra-sim .
sudo docker run -dt --name astra-sim astra-sim
sudo docker exec astra-sim ./build/astra_analytical/build.sh
After building the container, you should see the following output indicating a successful build of Astra-Sim using CMake.
[ 98%] Building CXX object AstraSim_Analytical/CMakeFiles/AstraSim_Analytical_Congestion_Aware.dir/congestion_aware/main.cc.o
[ 99%] Linking CXX executable ../bin/AstraSim_Analytical_Congestion_Unaware
[100%] Linking CXX executable ../bin/AstraSim_Analytical_Congestion_Aware
[100%] Built target AstraSim_Analytical_Congestion_Unaware
[100%] Built target AstraSim_Analytical_Congestion_Aware
Loading Astra-Sim Execution Traces
After Astra-Sim has been built, we can load the execution traces into the Astra-Sim container with a basic docker copy.
sudo docker cp chakra_traces astra-sim:/app/astra-sim/inputs/workload/ASTRA-sim-2.0Now, we have all our data inside the container to run Astra-Sim.
Running Astra-Sim
After the binary is built, you can run a simulation in Astra-Sim using the following command:
BINARY=./build/astra_analytical/build/bin/AstraSim_Analytical_Congestion_Unaware
WORKLOAD_CONFIG=./inputs/workload/ASTRA-sim-2.0/chakra_traces
SYSTEM_CONFIG=./inputs/system/Switch.json
NETWORK_CONFIG=./inputs/network/analytical/Switch.yml
REMOTE_MEMORY_CONFIG=./inputs/remote_memory/analytical/no_memory_expansion.json
STATS=/results/run_initial_stats/

sudo docker exec astra-sim ${BINARY} \
  --workload-configuration=${WORKLOAD_CONFIG} \
  --system-configuration=${SYSTEM_CONFIG} \
  --network-configuration=${NETWORK_CONFIG} \
  --remote-memory-configuration=${REMOTE_MEMORY_CONFIG} \
  --path=${STATS}
Finally, you will get an output like the following indicating the simulation has terminated.
sys[62] finished, 6749042 cycles
sys[61] finished, 6749042 cycles
...
sys[0] finished, 6749042 cycles
sys[63] finished, 6749042 cycles
For more details about configuring Astra-Sim, please see the Run Astra-Sim Documentation. For more information about configuring Astra-Sim, check out the Astra-Sim Tutorial from ASPLOS which provides a comprehensive overview of the simulator.
Summary
In this tutorial, we have defined a simple CNN model for classifying the MNIST dataset. Model training was analyzed with PyTorch Profiler and traces were collected. Traces were then able to be: analyzed and converted into Chakra executions traces. Finally, Astra-Sim was then used to simulate how these traces would execute on a network.
If you want to play around with this yourself, you may use Google Collab to view this entire process as a notebook.
GitHub Copilot best quality is making programmers language agnostic
Stay in touch
Subscribe to my RSS feed to stay updated
Have any questions
Feel free to contact me! I will answer any and all inquires