Machine Learning with TensorFlow JS
The main points of contention upon discussing the initial proposal were:
- differentiation from CS 4770
- differentiation from Node another course taught at Forge
- desire to use newer, more exiting AI tools such as OpenAI
- simplicity for newer programmers
What you will learn
Through interactive projects, this course seeks to give students a broad understanding of machine learning topics. However, depth with be developed through interactive projects.
The main goals of this course are:
- Using machine-learning APIs (ex. OpenAI) in your projects
- The principles of building machine-learning systems
- Principles of good metric design
- Understanding machine learning issues
Why JavaScript?
JavaScript may seem like a strange choice for a machine-learning library. JavaScript was designed for single-threaded operation, web use and is not as performant C, C++ or Rust.
However, JavaScript is portable, flexible and great for describing the structure of models. Thanks to WebGL calculations can take place on the GPU. These considerations make TensorFlowJS, the JavaScript implementation of TensorFlow even slightly faster for smaller models (only when models are far larger does performance drop by ~10 to 15 times).
Given this course’s goal to develop a foundational understanding of machine learning and TensorFlow as well as to create communicable projects, JavaScript is the clear choice.

Communicability of JavaScript
When building projects for a resume or otherwise, you should be always biased towards things that someone reviewing your programming portfolio can visualize. Without trying to toot my own horn too much, here is a project I build to analyze International Science and Engineering Fair (ISEF) projects which featured an interactive, web-based visualization.
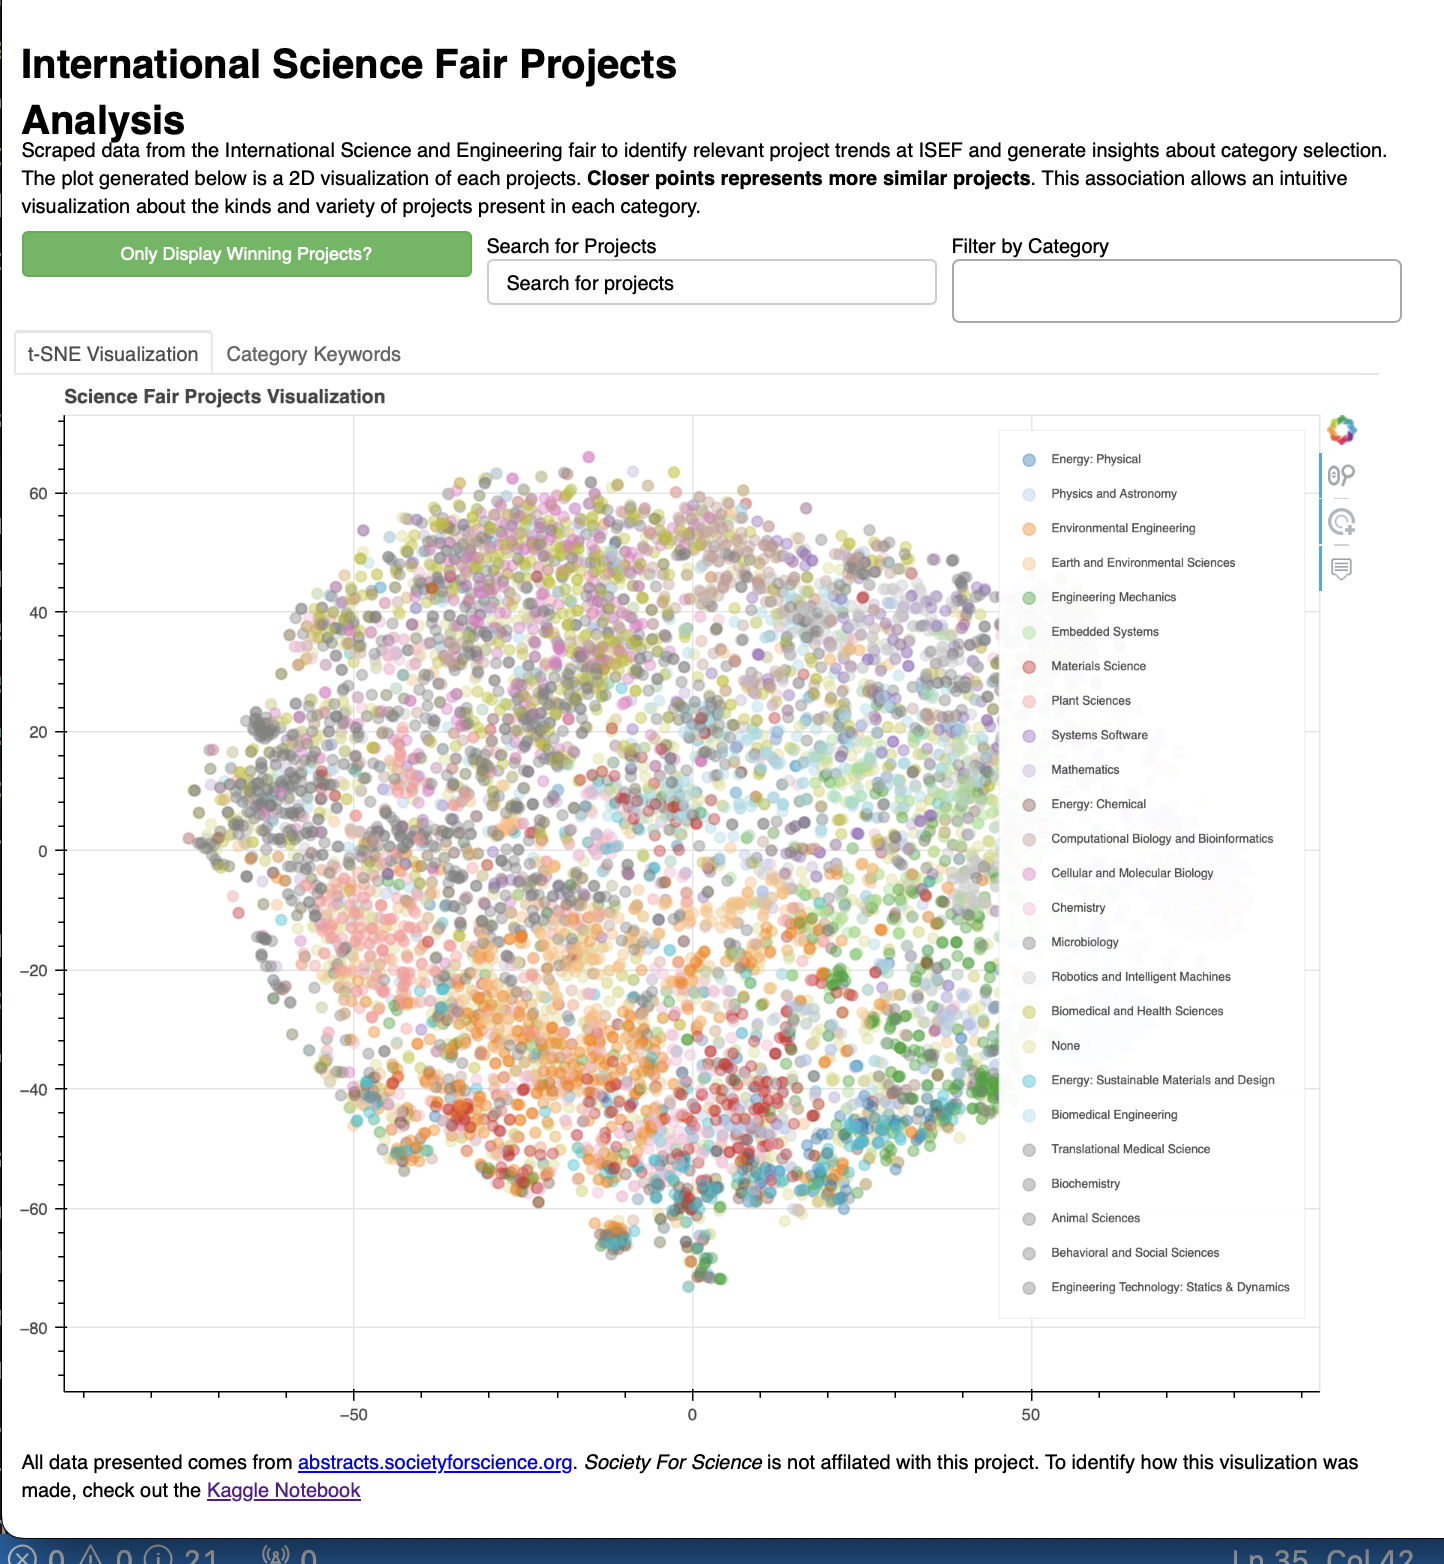
Being able to send people both an article and a interactive demonstration was incredibly valuable for project communication.
Course Contents
From a general perspective, models will become simpler as you move throughout the semester, but you will have more fine-grained control over them.
The first guided lab / project will be to create a wrapper for gpt-3.5-turbo (also known as ChatGPT) in the command line using javascript and openai’s library.
After this, we will venture into more foundational artificial intelligence including neural networks, natural language processing, time-series estimation, image processing and more. The goal of this course is to learn what their is to learn.
Schedule
| Week | Lecture | Workshop | Readings | Take Home |
|---|---|---|---|---|
| 1 | What is Machine Learning? | JavaScript Demo | Introduction to JavaScript | None |
| 2 | What does Machine Learning Require? | node demo + functional programming | Functional Programming in JavaScript | Chat GPT in Terminal - Using OpenAI API |
| 3 | Neural Networks | TensorFlow JS Workshop | The Curse of Dimensionality | MNIST Classifier |
| 4 | Good data’s importance | Cleaning a real data set | Data collection practices and trends | None |
| 5 | Time-Series Processing | TensorFlow Visualization | Types of Attention | Stock Market Predictor |
| 6 | Natural Language Processing | Shakespeare Predictor | None | None |
| 7 | Unsupervised learning | Clustering Research Papers | Unsupervised PreTraining | None |
| 8 | Final Project Advising | None | None | None |
| 9 | Final Project Showcase | None | None | None |
Sections
Each section here could be thought of a slide on a page which will be mentioned.1
Introduction to Machine Learning
- Breaking down recent advancements in AI
- ChatGPT
- Alpha Go
- Alpha Zero
- Alpha Fold
- Dale 2
- Hype-management
- Machine-Learning as Advanced Regression
- The “Machine Learning Formula”
- Machine learning model types (supervised, unsupervised and reinforcement learning)
JavaScript Intro / Refresher
- Functional programming
- Interpreted languages
- v8’s performance advantages
- WebGL and WebGPU
- Machine-Learning tasks being highly scalable
Exploratory Data Analysis
- Data preprocessing
- Filling gaps
- Visualization Techniques
- The Curse of Dimensionality
- SciKit Learn’s Machine Learning Types
- Decision Trees
- Support Vector Machines
- Ensemble Learning
- Precision versus recall
- Loss functions
- Hyper-Parameters and their optimization
- Paper: The Unreasonable Effectiveness of Data Neural Networks
History
- Underlying Linear Algebra
- Activation functions (Sigmoid, ReLu and Tanh)
- Gradient descent from the chain rule
- N-Adam, Adam and Adabost optimizers
- Normalization’s importance
- Encoding methods
- Keras and TensorFlow’s Sequential Model
- Confusion Matrices
- Project 1: MNIST Handwritten Digit Classifier in TensorFlow JS
Graph Computation
- TensorBoard
- Just-In Time (JIT) Compilation
- Optimizers
- Image Processing
- Convolution Neural Networks (CNNs)
- Keras Data Augmentation
- Transfer Learning
- Fine-Tuning Models
Time-Series Processing
- Structure of time-series networks
- Recurrent Neural Networks (RNNs)
- Limitations of RNNs
- Training RNNs through creating windowed training data
- TensorFlow Datasets
- Spectrograms and Fast Fourier Transforms (FFTs)
Natural Language Processing
- Tokenizers
- Memory gap
- Memory Modules
- Long-Short Term Memory (LSTM)
- Gated Recurrent Unit (GRU)
- Deep Learning
- Paper: Imagenet classification with deep convolutional neural networks’s influence
Garbage in, Garbage out
- Reinforcement learning with human feedback
- The Transformer Revolution
- Transformer Architecture
- Peak model size illustrated with a GPT comparison
- Production issues with models
- Attention saliency
- Paper: Attention is all you need
Deployment
- TensorFlow Modules
- Serving
- JavaScript
- LITE
- Parameter Reduction
- Entropy-biased training
- Online Algorithms
- Data Rot
ChatGPT Policy
Use of ChatGPT will be heavily encouraged uring this course. Because this course is designed to be an introduction to the field, many topics will be covered to yield some of what is out. Because of this, however, topics may not get the full attention they deserve. For this reason, tools like Chat GPT will be encouraged for topics where you know what to do just maybe not how (ex. how do I create an array in JavaScript).
Personally, one of the best uses of Chat GPT is to make programmers multilingual and multi-paradigm.
JavaScript and Python Similarities
For those concerned about the transferability of experience, here is the virtually identical code for creating a basic linear regression in both Python and JavaScript using TensorFlow and TensorFlowJS, respectively.
JavaScript
// Importing the required libraries
const tf = require('@tensorflow/tfjs')

// Defining the structure of the model as being linear
const model = tf.sequential()
model.add(tf.layers.dense({
    units: 1,
    inputShape: [1]
  }))

// Compiling the model so it can be sent to the GPU
model.compile({
    loss: 'meanSquaredError',
    optimizer: 'sgd', // simple gradient descent
  })

// Submitting the input data
const x = tf.tensor2d([[1], [2], [3], [4]], [4, 1]); // [4, 1] is the dimensions of the input
const y = tf.tensor2d([[2], [4], [6], [8]], [4, 1]); // [4, 1] is the dimensions of the input

// Training the model
model.fit(x, y, {
    epochs: 100
  }).then(() => {
      console.log("Model trained successfully")
  })
Python
# Importing the required libraries
import tensorflow as tf
from tensorflow import keras

# Define the model architecture
model = keras.Sequential()
model.add(keras.layers.Dense(units=1, input_shape=[1]))

# Compile the model
model.compile(optimizer='sgd', loss='mean_squared_error')

# Prepare the data
x_train = [[1], [2], [3], [4]]
y_train = [[2], [4], [6], [8]]

# Train the model
model.fit(x_train, y_train, epochs=100)
The code for both models is structurally identical and time spent learning TensorFlow JS will transfer over.
TensorFlow can also be tricky to install, particularly on Windows1. Even more insidious, TensorFlow takes up really 1.1GB. TensorFlowJS is far more lightweight at only 9 MB, 100x smaller.
// Saving models is really easy
await model.save('downloads://model_name')
Most Windows uses typically solve this problem by using an online Jupyter notebook such as Kaggle or Google Collabrotory. If you would like to try this, I much prefer Kaggle and have had many issues resolved in the past by simply running the same code in a Kaggle.
Most topics covered will only be done so in a brief capacity. A core design principle of this course is giving you a broader knowledge of what is out there, but going hands on a much smaller subset of topics.
JavaScript Introduction
JavaScript is a language full of quirks which people love to hate on. However, so long as you follow a simple basic steps, you are unlikely to run into these problems.
Weird History of JavaScript
JavaScript was created in 1995 when Netscape (many people will be unaware of who this even is) wanted to create a language for adding interactivity to their browsers. Two team competed: java makers sun microsystems (later bought by oracle) and Brendan Eich. Netscape went with Eich after he created ECMAScript (javascript’s real name) in 10 days.
Microsoft copied it creating JScript. Netscape, likely in response to Java’s growing popularity at the time, decided to rename ECMAScript into JavaScript. JavaScript has grew and grew over time, morphing to meet the newer needs of the web. Most significantly was AJAX or asynchronous javascript. Asynchronous means that tasks can be performed in the background to update the page without forcing a refresh on the user. Without AJAX sites like Google Docs could have been created.
Why JavaScript Became Good
Google, seeing an entirely new set of applications which could be built using JavaScript, made performance optimizations a key goal of the Chrome team. Google developed the v8 JavaScript engine. It can not be overstated how much faster was V8. Perviously considered a terrible inefficient language, the introduction of v8 made JavaScript over 100x faster.

Node JS
Node JS is a server-side JavaScript runtime. So, no browser is required to run JavaScript. Node’s creator, Ryan Dahl did not like that programmers had to know JavaScript for frontend development (client-side) and another language (c++, java, c, etc.) for backend development (server-side). Node took the power of v8 and brought it sever-side.
Node Package Manager
Node quickly became popular. Because programmers are lazy, commonly used chunk of code are duplicated and shared as packages. To accommodate packages being shared, the node package manager was created or npm for short.
- A package: some code, could be a full program or only a small part
Due to JavaScript’s interpreted nature, the runtime environment is highly standardized. If it runs on one computer, it will run on another (more or less) 1
Package Managers are life changing. Imagine installing any program you want with, all with a simple line of text (
npm install chrome).No more navigating to the website, clicking through download pages, and clicking agree to terms of use to download software, things just work.
Why is this background useful?
- JavaScript is a patchwork of a language, do not feel bad it if it is confusing
- Asynchronous JavaScript (AJAX) allowed interactivity in sites like Google Docs
- v8 turbocharged JavaScript by over 100x
- Node JS allows JavaScript to be run without a browser, making server-side deployment possible.
- Node Package Manager is how you get commonly used pieces of JavaScript software
Java and JavaScript: A Metaphor
Java and JavaScript are similar, not just syntax (both derived from C, the mother of all programming languages), but also in terms of functionality – thanks to the Java Runtime Environment and v8, both languages use just-in time (JIT) compilation to achieve high performance.
Those with a background in Java from AP Computer Science A, CSP or equivalent will find picking up JavaScript easy.
A major difference between Java and JavaScript is typing. JavaScrip is a weakly-typed language. So, instead of having to explicitly declare the type of a variable, you can use either let for a variable or const for a constant (var is the same thing as let for the most part, but let is preferred now 2 ).
Java and Javascript Equivalency Chart
| Java | JavaScript |
|
|
|
|
|
|
|
|
|
|
|
|
|
|
|
|
JavaScript and the Document Object Model (DOM)
JavaScript’s foundational use case was interaction with HTML document. An HTML document is comprised of a series of tags. Each tag represents an object to manipulate. This forms the Document Object Model (DOM).
<html>
  <h1>Hello there!</h1>

  <ul>
    <li>List item 1</li>
    <li>List item 2</li>
  </ul>

  <p>
    Lorum ism..
  </p>

</html>
Tags are more powerful than that and can have classes and ids attached to them along with other data. Additional information powers JavaScript selectors.
<a id="google-link" class="link strong" href="https://google.com">
  Click Me!
</a>
JavaScript is able to select and modify elements to the dom using each tag’s features.
| Name | Use | Selector | Example | Short Example |
|---|---|---|---|---|
| className | Functional | `` | document.getElementsByClassName('a') | $('a') |
| id | Unique | # | document.getElementById('google-link) | $('#id') |
| class | Styling + Logic | . | document.getElementsByClassName('strong') | $('.strong') |
the same can not be said of other languages like C which may have to have different variants of code for different build targets (ex. MacOS, Windows & Linux)
var has scoping issues which can cause memory leaks and unpredictable behavior
$ in JavaScript is JQuery and shorthand for document.querySelector. JQuery was a popular library which eventually became a core feature given how ubiquitous JQuery was.
Functional Programming in JavaScript
The general desire for functional programming comes from two main perspectives:
- flexibility
- function’s natural mappings to many programming tasks
Imagine the following dataset where we are tasked with finding out the age of everyone in a large data table
| Name | Birthday |
|---|---|
| David | 2/24/2005 |
| John | 2/18/2002 |
| Sue | 9/9/2009 |
| Amanda | 9/18/2001 |
Using declarative programming (what we are probably familiar with, you would likely use something like this)
const dataFrame = [
  ['David', '2/24/2005'],
  ['John', '2/18/2002'],
  ['Sue', '9/9/2009'],
  ['Amanda', '9/18/2001'],
];

const result = [];

for (const row of dataFrame) {
  const now = new Date().getFullYear();
  const birthday = new Date(row[1]);

  result.push(now - birthday.getFullYear());
}

console.log(result);
However, this code masks what we are doing. Everyone’s birthday calculation is independent. The for loop is doing the same operation for each row. When thinking about improving this code, we could first pull out the functionality of getting birthdays in years.
function getBirthdayInYear(input) {
  /*
   * Takes a standard American date in the format %m/%d/%Y (ex: 2/5/2001)
   * and calculates the difference between that and today's date
   */
  const now = new Date().getFullYear();
  const birthday = new Date(input);

  return now - birthday.getFullYear();
}

const resultSet = [];

for (const row of dataFrame) {
  resultSet.push(getBirthdayInYear(row[1]));
}
This code is better because what the code is doing getBirthdayInYear is clearly spelled out. If fact, because applying things to lists like this and compiling the results is so common, Python has this as a built-in feature.
const resultSet = dataFrame.map(row => getBirthdayInYear(row[1]));
Functions as arguments
Functions are a great way to customize the behavior of classes. For this, reason functions are often passed as arguments to other functions.
function myFunc() {
  console.log("My function!");
}

const x = myFunc; // setting x to a function!
x(); // Prints: My function!
A good example of why this can be incredibly useful is the TenorFlow API itself. Without getting too technical, models have a few key characteristics: their structure or what kind of layers make them up, their loss function and their training data.
In TensorFlow all of these are functions:
- Sequence - A layer cake of types for defining how input flows from the beginning to the end
- The loss function takes what the model predicted and the correct output and measure how bad the model is
- Training data comes in the form of a pipeline which generates a new batch of samples every time it is called
Anonymous (Lambda) functions
get_birthday_in_year is a unique function which we might want to test and reuse in multiple parts of our code. However, what if our function was doing something trivial and the name or docstring of the function was not really important. This is where lambda functions come in.
Lambda functions are anonymous functions (they don’t have a name), but still take input an output.
Why are they called
lambdafunctions? Well, mathematicians like using the $\lambda$ symbol so that could be why
Imagine I have a class representing a person:
class Person {
  constructor(name, age) {
    /*
     * Creates a new person
     */
    this.name = name;
    this.age = age;
  }
}

const people = [
  new Person("Joe", 23),
  new Person("Sue", 44),
  new Person("Bob", 91),
  new Person("Sam", 32)
];
A I have a list of these objects and would like to sort them. Those familiar with Java might be inclined to use a compare_to method which tells which comes first in a sequence. However, you only get one of these. What if you wanted to sort people by both name and age.
JavaScript has an Array.prototype.sort() method for custom sorting. To know where to place each item, JavaScript has two know, given two numbers, which one comes before the other.
This is where arrow (lambda) functions come in. Arrow functions are shorthand developers created for functions which do not have to have names. Arrow functions use the (\* inputs *\)=>{\* code *\} syntax.
function myFunction(){
  console.log("My function!");
}

// is the same as

const myOtherFunction = () => {
    console.log("My Other Function");
}
So, to sort by name, we define a function (a, b) => {} which compares and a and b either by name or age.
// Comparing by name
const sortedByName = people.sort((a, b) => a.name.localeCompare(b.name));

// Comparing by age
const sortedByAge = people.sort((a, b) => a.age - b.age);
Here, the power of arrow functions as they provide a way to pack a large amount of functionality into relatively little code.
Functional Programming (FP) versus Object-Oriented Programming (OOP)
Using functions in your code like this is known as Functional Programming (FP) which can serve in contrast to Object-Oriented Programming (OOP). While functional programming has a ton of advantages, try and not go too trigger happy. Objects still serve a purpose and can be a great way to group data in a neat and organized way. Though more limiting in some ways, objectification can often force you to think about how to structure your data more intelligently.
Summary
Functional Programming (FP) should be an incredibly useful tool in your arsenal in for this course in particular and particularly in terms of machine learning.
Chat GPT in Terminal
Chat GPT is great and provides a quick way to gain a little bit of knowledge about practically anything.
This take-home lab is designed to give you a little bit of experience with:
- Using Application Programming Interfaces (APIs)
- Creating accounts
- Dealing with API keys
- Creating a
npmproject - Creating a command line app
Steps
Install Node
Make sure you have node package manager npm and node installed on your system.
Create a Node project
mkdir chat-gpt-cli
cd chat-gpt-cli
npm init -y
code .
Install the required dependencies
- cleye: a package which makes creating typed command line interfaces super simple
- clack: a Text UI library (TUI) which allows for very nicely formatted command line output. Has prebuilt components for:
- text blocks
- input blocks
- spinners
- more
- OpenAI: OpenAI’s JavaScript wrapper1.
npm install -D cleye @clack/prompts openai
Create a file for your entrypoint
index.js is the entrypoint for your node program. However, index.js by default is not set up to parse command-line arguments. Handling these arguments requires cleye (the name of this is a pun if you have not already noticed).
import { cli } from 'cleye';
import { outro, text, spinner } from '@clack/prompts';
import OpenAI from 'openai';

const argv = cli({
  name: 'index.js',
  parameters: [
    '[arguments...]',
  ],
})

let initial_prompt = argv._.arguments.join(' ');
Arguments are an array of strings.
Because spaces define separate arguments, joining separate words together with a space is required to get back to string form.
Editing your package.json
Node does not like to use import statements unless you tell it to. To do this, you need to add a type field to your package.json file.
{
  "type": "module"
}
Getting API keys
We are going to do this a little bit backwards and explain how to get API keys into your program securely. To do this, we need to leverage environment variables. While scary-sounding, your environment variables look something like this:
Example Code:
export USERNAME=johndoe
export GITHUBAPIKEY=n83ncxz9m39a012
In my opinion, using upper case for environment variables is less readable when compared to
snake_caseorcamelCase. Using all caps is merely convention through.
These are effectively “common variables” which other programs can access. Reading an environment variable is easy and something which is accessible to all programs.
echo $GITHUBAPIKEY
const github_api_key = process.env.GITHUBAPIKEY;
Why not just store it in your code?
Why not just put the key in your code? First, having keys in your code can made updating them kind of cumbersome (changing environment variables remotely is really difficult). Second, security. You could accidentally commit your code to a public repository. One of your team members could go rouge and post it online. You could accidentally use the production api key in testing and accidentally delete your user’s data.
Committing your API key accidentally is such a large problem on sites like GitHub that automated companies will search your code for “high entropy strings” and automatically notify you if detected ( I have gotten quite a few of these emails myself).
Creating a OpenAI account
Setting up an account with a third-party service can be a bit tedious, but actually going through the motions. Got to playground.openai.com and setup an account if you have not made one already.
This technically costs money, but this particular API is comically cheap. My cost to use
gpt-3.5-turbohas been less than0.01for about150requests.
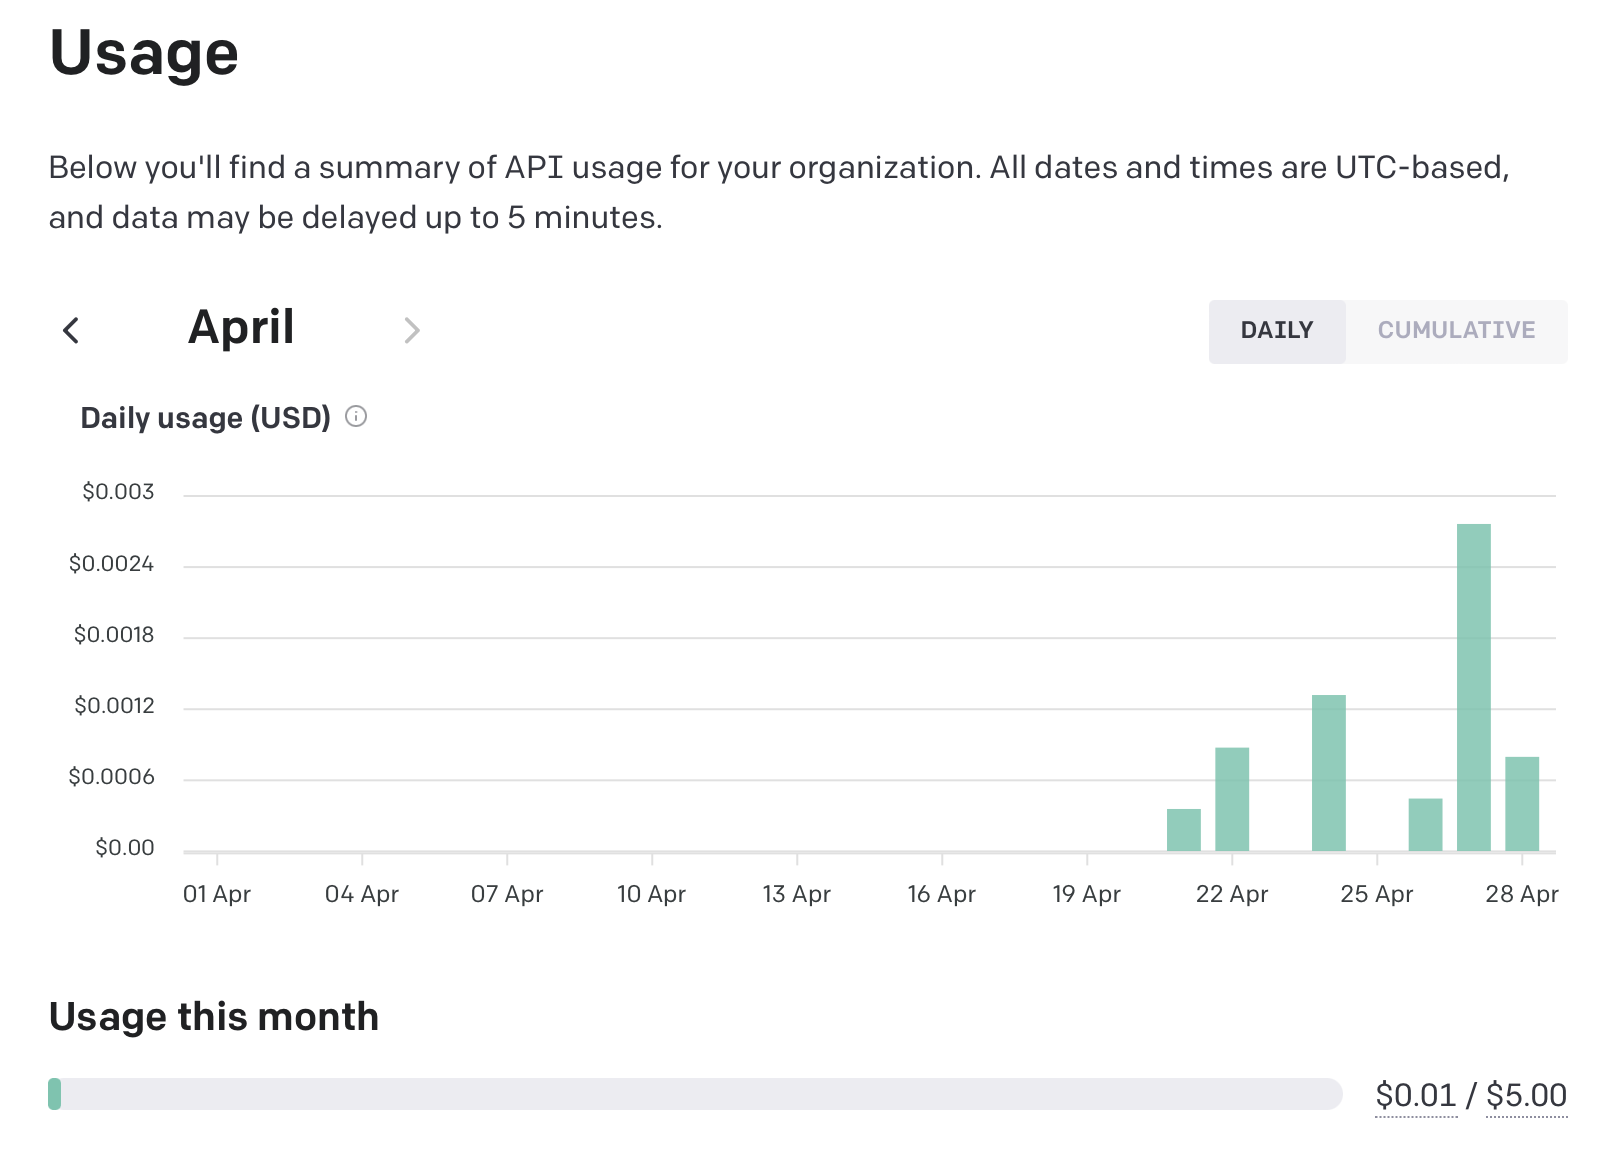
Set a limit
DO THIS. No one talks about the accidentally leaving a Web Service running to poverty pipeline. I though that $5 was reasonably fo me and adjusting this is easy in the future. If immediately losing access is a problem, setting a soft limit will give you an email when you are about to reach it.

I once left an AWS Free Tier S3 Instance on and it ended up costing my parents several hundred dollars as my parents got the email and did not know what to do with them.
Create an API key
Generate an API key and make sure to save this in your project in a file named .env.
Fun Fact: files or folders with a leading
.are not shown the the user immediately on MacOS or Linux. This is why the folder.gitstores all of the information about a repository and.envcan store environment values. In addition, programs like Visual Studio Code and NetBrains will create configuration files for your project which are hidden.
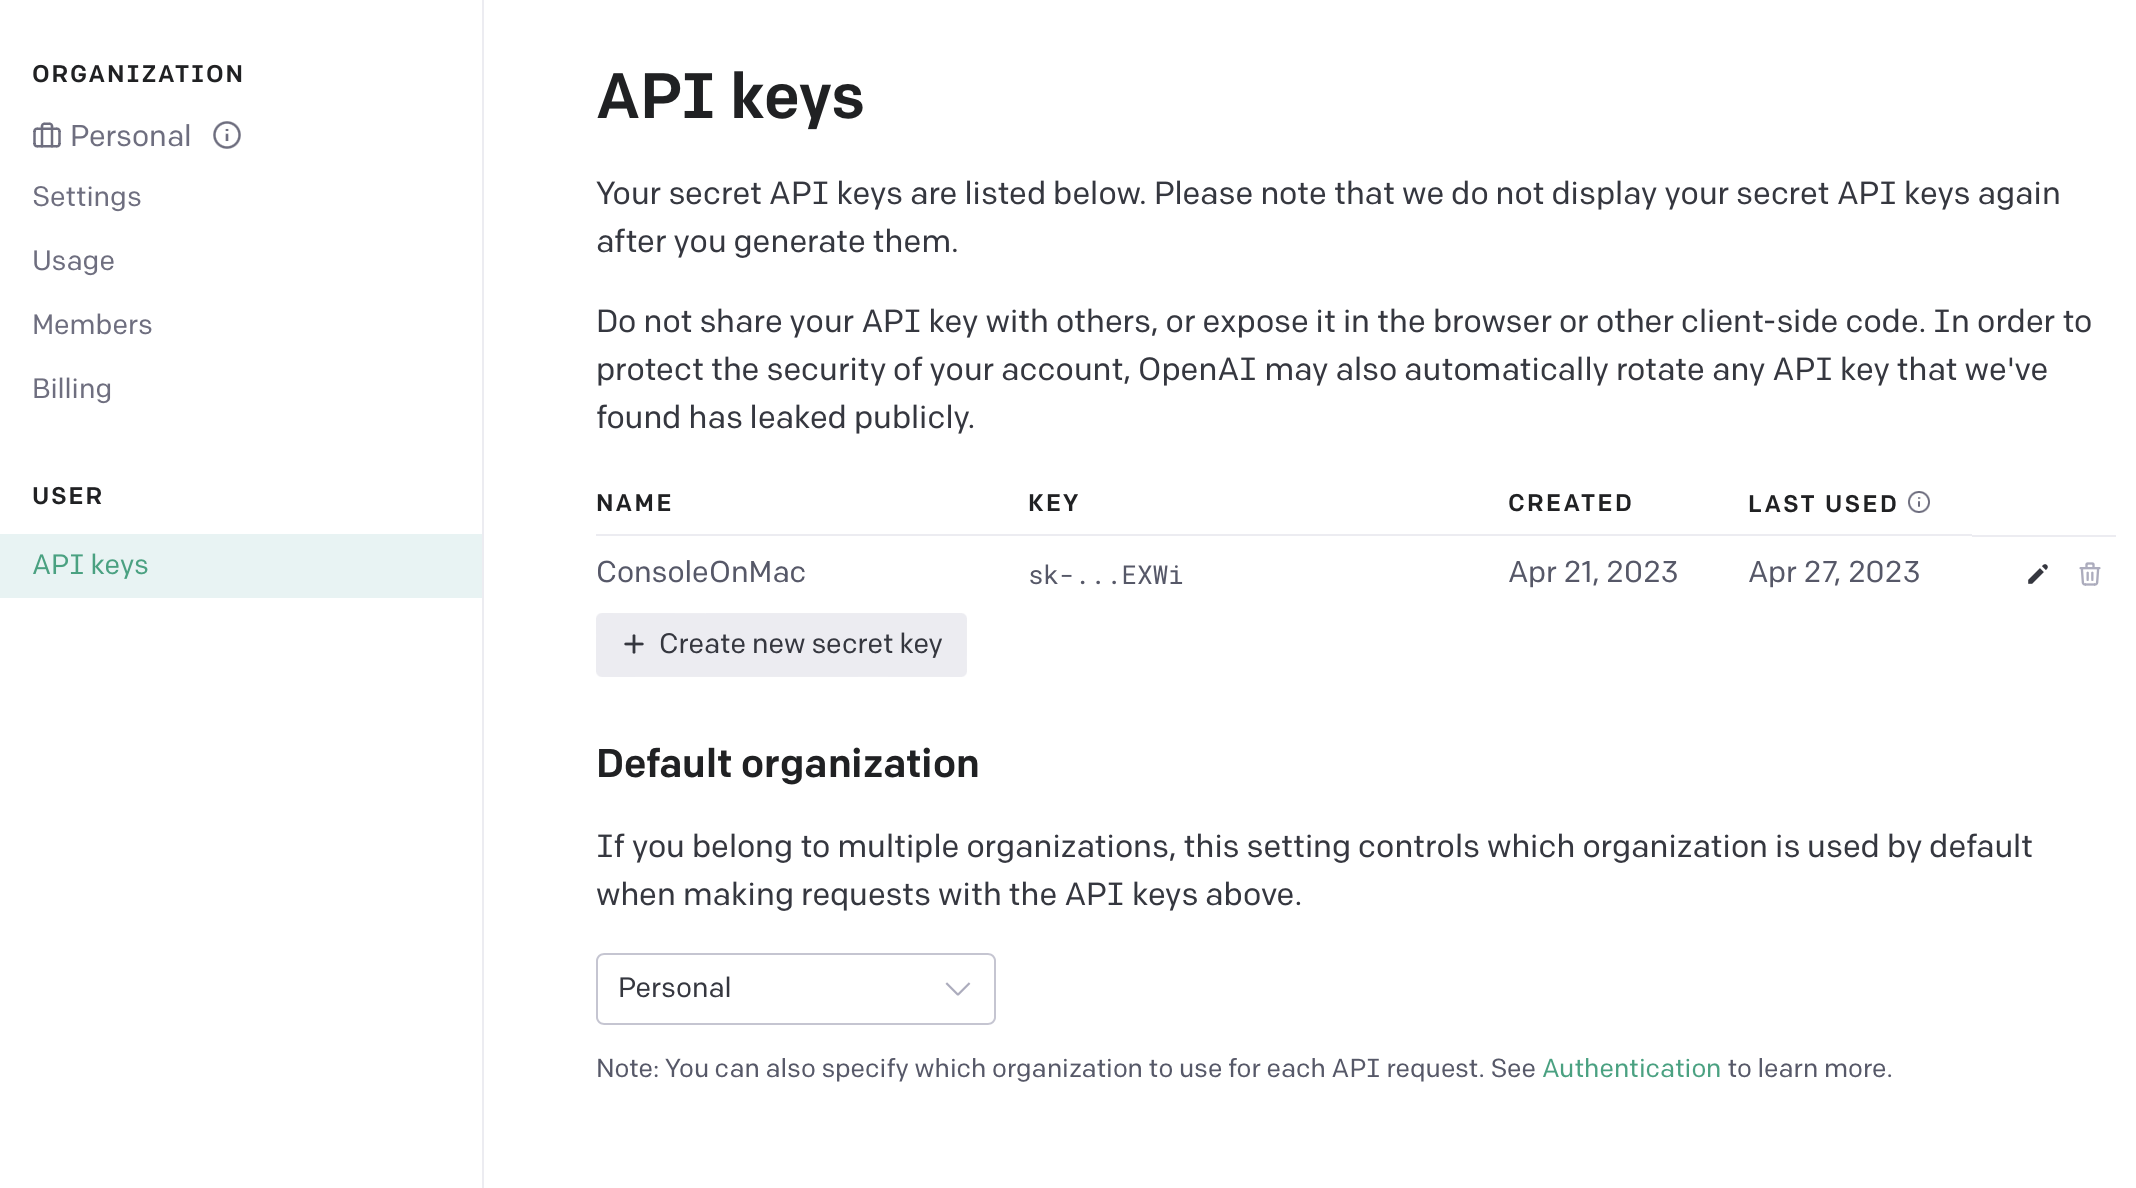
export OPENAI_API_KEY=/* Your AI key */
Using your API key
Set your API key to a local variable when the user runs your command
const openai = new OpenAI({
  apiKey: process.env["OPENAI_API_KEY"]
});
Because one of ChatGPT’s killer features is the ability to answer new questions using the context of older ones, when we call the API, we not only provide a single question, but also a list of prior questions.
const chatHistory = []; // when the conversation starts, no history is present
Code architecture
Chat GPT is, in effect a series of prompts and responses. Therefore, instead of having a large for loop which handles each prompt, we could alternatively make a prompt function which handles this behavior for us.
The prompt should first ask the user for some text. This is where clark can make both our output and code look much nicer.
async function prompt(){
  const userPromptText = await text({
    message: "What do you want to say?",
    placeholder: `send a message (type 'exit' to quit)`,
    validate: (value) => {
        if(!value) return "please enter a valid prompt"
      }
    });

  // more code to come
}
Now, we have the user’s prompt. Before doing anything else, a quick check to make sure the prompt is not exit is needed before going on.
  if(userPromptText === 'exit'){ // javascript is weird and users triple equals to check for equality. Note using this can lead to some weird bugs
    outro("By, thanks for chatting with us")
    process.exit(0); // 0 means the program did not crash
  })
Now we are ready to start making a request. Using a spinner before going any further provides a visual indication that the program is working. After this, we must add the userPromptText to the chat history. Then, we must make a call to OpenAI to get the response.
// still in prompt

const waitSpinner = spinner();
waitSpinner.start("Thinking...");

chatHistory.push({
    role: 'user',
    content: userPromptText
  })

const generatedText = await getResponse({
    prompt: chatHistory, // the history is the prompt
    openAIKEY
  })
Because ChatGPT takes a few seconds to generate a response, the API gives a stream of data which is shown to the user incrementally (think about the official website). However, dealing with streams in this context is more complicated than necessary, so you are encourage this pre-provided snippet of code.
async function getResponse(chatHistory){
  const completion = await openai.chat.completions.create({
    model: 'gpt-3.5-turbo',
    messages: chatHistory
  })
  return res.data.choices[0].message.content
}
In your process code, you want to first stop your spinner with a message. Then write the text you received as a string to standard output. Then, use a recursive call to make this go on forever.
waitSpinner.stop("text completed")

console.log(generatedText);

console.log('\n\n'); // adding a few new lines

prompt(); // recursive call

// end of prompt
Putting it all together
In case I lost you there, here is the full code for index.js. You are also able to see the full project on Github.
import { cli } from 'cleye';
import { outro, text, spinner } from '@clack/prompts';
import OpenAI from 'openai';

const openai = new OpenAI({
  apiKey: process.env["OPENAI_API_KEY"]
});

const argv = cli({
  name: 'index.js',
  parameters: [
    '[arguments...]',
  ],
})

const chatHistory = [];

let initialPrompt = argv._.arguments.join(' ');

// TODO: Maybe you could find something to do with the initial prompt

async function getResponse(chatHistory){
  const completion = await openai.chat.completions.create({
    model: 'gpt-3.5-turbo',
    messages: chatHistory,
  })

  return completion.choices[0].message.content
}

async function promise(){
  const userPromptText = await text({
    message: "What do you want to say?",
    placeholder: `send a message (type 'exit' to quit)`,
    validate: (value) => {
      if(!value) return "please enter a valid prompt"
    }
  })

  if(userPromptText === 'exit'){
    outro("By, thanks for chatting with us")
    process.exit(0)
  }
  const waitSpinner = spinner();
  waitSpinner.start("Thinking...");

  chatHistory.push({
    role: 'user',
    content: userPromptText
  })

  const generatedText = await getResponse(chatHistory)

  waitSpinner.stop("Generation finished")

  console.log(generatedText)
  console.log("\n\n")

  chatHistory.push({
    role: 'system',
    content: generatedText
  })

  promise();
}

promise();
Summary
This was a very busy activity, but through this, you got initial exposure to many things. Namely:
- Textual User Interface Libraries (TUIs) by using
clarkto make the output of your program much nicer - Creating Command Line Interfaces (CLIs) with
cleyeso this application can be run onMacOS,LinuxandWindows - Using an API wrapper with
openai - Functional Programming by using anonymous functions
- Using
node.jsto run this function
However, this is not a complete program as there are some UI / UX steps we can take to make the output more human readable. A couple of these problems represent good first step to improve your program.
- Using
clarkto display the results of the model - Rendering code block which have
\`` code ```` surrounding to be drawn separately. This behavior comes from the Markdown Syntax Guide
- Implementing all of Markdown highlighting is feasible for this project, but code highlighting can be a good first step.
- Saving
chatHistoryto a file using theJSONfile format and adding the ability to save and load previous conversations.
require('fs')and then usingfs.writeFileSync(location, text)fs.readDir(folder, (err, files) => {/* Process them */})will give you a list of files in a directory as a listJSON.stringify(object)will turn anobjectinto astringJSON.loads(object)will turn astringinto anobjectclackhas amultiselectoption which takes a list of objects withlabelsandvaluesand allows you to accept an option from them
OpenAI has a REST API which is a series of endpoints for starting chats, creating accounts and moe. However, OpenAI also has a node module which wraps the API into a nice set of functions for you and automatically handles the minor processing which you would have had to otherwise implement on your own. It is quite common for more popular APIs to have wrappers in sometimes multiple languages (python, javascript, java are common). Reusing their code can be a great way to save time.
MNIST Lab
Do you ever struggle to read your own handwriting? Computers do too.
Model specifications
Your goal is to classify 28x28 black and white images of digits (0-9) in TensorFlow JS. The dataset for this project is the MNIST Database. Hands-down, MNIST is the most popular data set for machine learning. So prevalent that it is included by default by most machine-learning libraries.
Goal for this lab
If using MNIST is almost a cliche, why do it?
A key difference is our implementation of MNIST in a modern web browser using JAVASCRIPT?. Yes, we will be using JavaScript. For those concerned about performance implications when compared to lower-level languages like C++, our code will still take care of parallelism through WebGL1
Getting Started
Getting started requires a decent amount of tedious software installs. However, getting setup is essential for labs later on.
Node install
Node allows JavaScript to be run through your terminal. While we will not be actually using Node to run our TensorFlow JS code, having node allows us to use JavaScript tooling which is a big help.
MacOS / Linux
On MacOS, installing through a package manager like Homebrew is recommended.
brew install node
Alternatively, navigate to to Node’s website
Windows
Like MacOS / Linux, windows users can also install via winget, however most people will not have a package manger installed on their windows machine.
For this reason, most people should install through Node’s Website
NPM Package Installs
npm install vite
npm creates vite@latest mnist_in_js --template vanilla # creates a project using vanilla js
What did we just do?
Vite creates a template project using vanilla JavaScript. You get a really basic HTML web page as well as a src directory to put your code.
Creating a project with vite allows you to easily manage third-party JavaScript packages. So we are now going to install TensorFlow JS.
First, we have to enter the new project we just created:
cd mnist_in_js
Next, install TensorFlow JS.
npm install tjfs@latest # Installs the latest version of TensorFlow in your project
Getting TensorFlow setup
In the src directory of the main course, there is a main.js file. By default, this contains some demo code. Delete all default code.
const model = tf.sequential([
  tf.layers.dense({
      units: 10,
      inputShape:[1] // a scalar number
    })
]);

model.compile({
  loss: 'meanSquaredError',
  optimizer: 'sgd'
});

// Tensors take data first, then the dimensions that data is in
const xs = tf.tensor2d([-1, 0, 1, 2, 3, 4], [6, 1])
const ys = tf.tensor2d([-3, -1, 1 3, 5, 7], [6, 1])

await model.fit(xs, ys, {epochs: 250})
Great! You have just created your first model.
Task on your own
Use TensorFlow JS to create a model which classifies MNIST images.
As a helper, here is the data loading code:
import * as tf from "@tensorflow/tfjs";

export const IMAGE_H = 28;
export const IMAGE_W = 28;
const IMAGE_SIZE = IMAGE_H * IMAGE_W;
const NUM_CLASSES = 10;
const NUM_DATASET_ELEMENTS = 65000;

const NUM_TRAIN_ELEMENTS = 55000;
const NUM_TEST_ELEMENTS = NUM_DATASET_ELEMENTS - NUM_TRAIN_ELEMENTS;

const MNIST_IMAGES_SPRITE_PATH =
  "https://storage.googleapis.com/learnjs-data/model-builder/mnist_images.png";
const MNIST_LABELS_PATH =
  "https://storage.googleapis.com/learnjs-data/model-builder/mnist_labels_uint8";

/**
 * A class that fetches the sprited MNIST dataset and provide data as
 * tf.Tensors.
 */
export class MnistData {
  constructor() {}

  async load() {
    // Make a request for the MNIST sprited image.
    const img = new Image();
    const canvas = document.createElement("canvas");
    const ctx = canvas.getContext("2d");
    const imgRequest = new Promise((resolve, reject) => {
      img.crossOrigin = "";
      img.onload = () => {
        img.width = img.naturalWidth;
        img.height = img.naturalHeight;

        const datasetBytesBuffer = new ArrayBuffer(
          NUM_DATASET_ELEMENTS * IMAGE_SIZE * 4
        );

        const chunkSize = 5000;
        canvas.width = img.width;
        canvas.height = chunkSize;

        for (let i = 0; i < NUM_DATASET_ELEMENTS / chunkSize; i++) {
          const datasetBytesView = new Float32Array(
            datasetBytesBuffer,
            i * IMAGE_SIZE * chunkSize * 4,
            IMAGE_SIZE * chunkSize
          );
          ctx.drawImage(
            img,
            0,
            i * chunkSize,
            img.width,
            chunkSize,
            0,
            0,
            img.width,
            chunkSize
          );

          const imageData = ctx.getImageData(0, 0, canvas.width, canvas.height);

          for (let j = 0; j < imageData.data.length / 4; j++) {
            // All channels hold an equal value since the image is grayscale, so
            // just read the red channel.
            datasetBytesView[j] = imageData.data[j * 4] / 255;
          }
        }
        this.datasetImages = new Float32Array(datasetBytesBuffer);

        resolve();
      };
      img.src = MNIST_IMAGES_SPRITE_PATH;
    });

    const labelsRequest = fetch(MNIST_LABELS_PATH);
    const [imgResponse, labelsResponse] = await Promise.all([
      imgRequest,
      labelsRequest,
    ]);

    this.datasetLabels = new Uint8Array(await labelsResponse.arrayBuffer());

    // Slice the the images and labels into train and test sets.
    this.trainImages = this.datasetImages.slice(
      0,
      IMAGE_SIZE * NUM_TRAIN_ELEMENTS
    );
    this.testImages = this.datasetImages.slice(IMAGE_SIZE * NUM_TRAIN_ELEMENTS);
    this.trainLabels = this.datasetLabels.slice(
      0,
      NUM_CLASSES * NUM_TRAIN_ELEMENTS
    );
    this.testLabels = this.datasetLabels.slice(
      NUM_CLASSES * NUM_TRAIN_ELEMENTS
    );
  }

  /**
   * Get all training data as a data tensor and a labels tensor.
   *
   * @returns
   *   xs: The data tensor, of shape `[numTrainExamples, 28, 28, 1]`.
   *   labels: The one-hot encoded labels tensor, of shape
   *     `[numTrainExamples, 10]`.
   */
  getTrainData() {
    const xs = tf.tensor4d(this.trainImages, [
      this.trainImages.length / IMAGE_SIZE,
      IMAGE_H,
      IMAGE_W,
      1,
    ]);
    const labels = tf.tensor2d(this.trainLabels, [
      this.trainLabels.length / NUM_CLASSES,
      NUM_CLASSES,
    ]);
    return { xs, labels };
  }

  /**
   * Get all test data as a data tensor and a labels tensor.
   *
   * @param {number} numExamples Optional number of examples to get. If not
   *     provided,
   *   all test examples will be returned.
   * @returns
   *   xs: The data tensor, of shape `[numTestExamples, 28, 28, 1]`.
   *   labels: The one-hot encoded labels tensor, of shape
   *     `[numTestExamples, 10]`.
   */
  getTestData(numExamples) {
    let xs = tf.tensor4d(this.testImages, [
      this.testImages.length / IMAGE_SIZE,
      IMAGE_H,
      IMAGE_W,
      1,
    ]);
    let labels = tf.tensor2d(this.testLabels, [
      this.testLabels.length / NUM_CLASSES,
      NUM_CLASSES,
    ]);

    if (numExamples != null) {
      xs = xs.slice([0, 0, 0, 0], [numExamples, IMAGE_H, IMAGE_W, 1]);
      labels = labels.slice([0, 0], [numExamples, NUM_CLASSES]);
    }
    return { xs, labels };
  }
}
WebGL is a library which parallel computation on the Web. This is most commonly used for graphics and is how engines such as Unity can publish to the web.